

How To Repair Broken Marble Slab
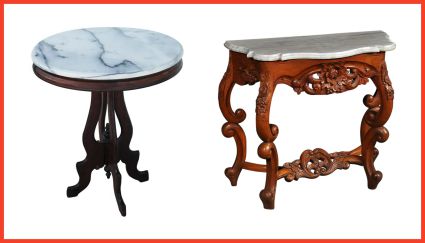
Marble is a pop stone that has been used since Roman times for sculpture, building, and furniture. In the Victorian era, Carrara marble was commonly used for tabletops and unfortunately is oft broken by careless moving companies. A croaky marble slab, with sentimental value, can hands be repaired by the handy homeowner:
- Check the edges to make sure they are make clean
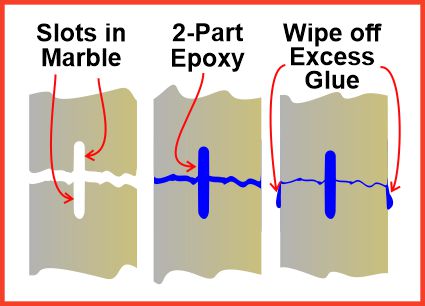
- Using a grinder, cut beige grooves to strengthen the join
- Utilise 2-part epoxy adhesive to both sides
- Remainder the 2 halves, so that the glue can ready nether gravity
- Fill the missing areas with tinted epoxy
What is Marble?
Marble is a metamorphic rock resulting from the transformation of limestones under high pressures and temperatures. Typical marble is formed by interlocking coarse crystals of calcite (CaCO3) or dolomite (CaMg(COiii)2. The characteristic gray swirls are caused by mineral impurities such as iron oxide, dirt, or silt.
Marble is a soft rock (Moh's hardness 3.5 to 4) and is easily scratched. It is too attacked by acids and so tin be pitted and marred by common household products like vinegar. For these reasons it is recommended that marble tabletops are coated with a stain-resistant sealer.
Marble is as well brittle and is easily be broken due to careless treatment (peculiarly by moving companies). The interruption very often follows a previous crack or a natural weakness like a vein or fissure in the stone.
Artistry in Glass is an Amazon Associate – we earn a commission from qualifying purchases.
How to fix a cracked marble slab
If you break a modern marble slab forming office of a kitchen countertop, consider replacing it with a new peak. Yet, with antique marble having sentimental value and, especially with custom shapes, it is well worth attempting a restoration. For all-time results, follow these steps:
Examine the edges
To ensure a strong glue joint it'southward essential that the two broken edges are perfectly make clean, free from dirt and grease, and from previous adhesives. If the crack occurs along a previous suspension it is highly probable that old adhesive volition be present.
Different adhesives need different solvents for removal. In practice, a combination of dissolving and picking or cutting away the old glue with a chisel or Exacto-knife is the best approach. Superglue (cyanoacrylates) dissolves in acetone and safe cement needs a commercial paint-stripper. Epoxies will loosen with heat but need a potent product like "Attack" Epoxy Adhesive Remover (available here on Amazon) for dissolving although "Goof Off" can sometimes be effective. In all cases, be sure to test an inconspicuous small area before proceeding and have care to read instructions, and follow safety precautions when using strong chemicals.
Optional "Biscuit" Jointing
Fifty-fifty with strong epoxy adhesive, considerable potential stress can exist applied to the relatively small glued surface area of a 1″ thick marble slab, especially if the substrate is uneven. So, to make sure of a secure bond, Artistry in Drinking glass has adapted the woodworkers' biscuit joint technique to the gluing of marble slabs.
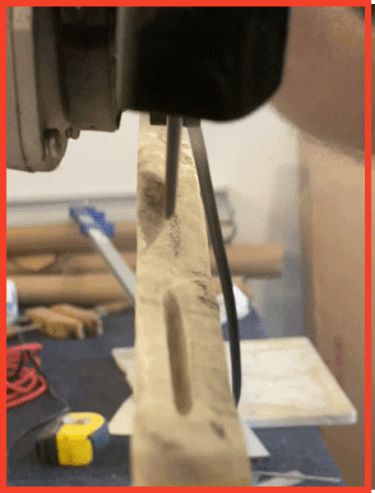
Marble is relatively soft and can easily be ground abroad using an angle grinder. Mark the two edges so that biscuit grooves stand for on reverse sides of the join. Be sure to vesture goggles and a dust mask and besides accept great intendance not to chip the slab surface by cutting too close to the edges.
Later on cutting the biscuits, castor off all the dust and wipe down the surfaces with rubbing alcohol or acetone (these evaporate without residual), in preparation for gluing.
Balancing the Slab
Before applying the agglutinative information technology'southward very important to set a balancing state of affairs considering even using quick-setting (five minute) epoxy, it is not possible to hold the 2 halves in place without arranging a support.

Information technology is virtually impossible to line up a broken marble slab when it is laid flat. A counter-intuitive fact is that the best style is to support the 2 halves vertically.
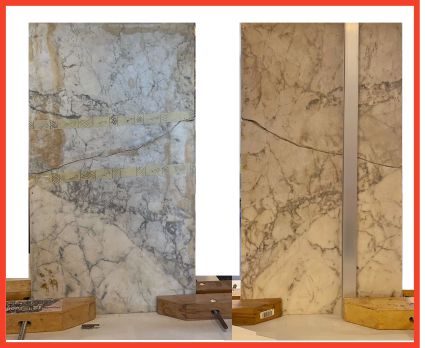
If the break is clean, the two halves should "primal-in" together to grade a perfect fit. Our recommended gluing method is to utilize the force of gravity to push and hold the upper piece in position while the glue hardens. Nosotros secure the lower part with woodworker's clamps as shown above.
Gluing the Slab
There is an enormous and disruptive range of epoxy adhesives available these days and it is hard to figure out which is all-time. The master factors that govern your selection for repair of china, pottery, marble, and rocks are the setup speed, the color, the force, and the possible caste of yellowing with exposure to UV light. Finally, the toll may be an upshot if you are using a large amount. For a marble slab, strength is the most important characteristic and we recommend an epoxy like JB Weld "Clear Weld" which has an advertised shear strength of 3900 lbs/sq in.
Making certain the edges of the marble are perfectly clean and dry, mix the epoxy, and apply generously to both sides. Normally, with a shut-fitting bring together, for example on a prc plate, nosotros demand a very thin layer of gum on just ane side of the join – however, where we are using the biscuit joining technique we need to use sufficient glue to fill the biscuits.
Place the top slice in the position you take prepared and utilize tape if necessary to stabilize the join. Immediately wipe off any excess epoxy with alcohol – this will save considerable fourth dimension scraping off dry glue subsequently. Check the alignment and get out the pieces overnight to set up up.
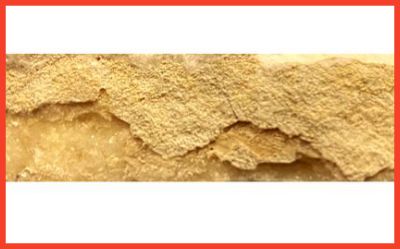
Filling the Crack
Fifty-fifty the cleanest suspension will have micro-chips or minor missing pieces that need to be filled. In our example, the break followed a previous fracture, a lot of material was missing, and a large amount of epoxy putty was needed.
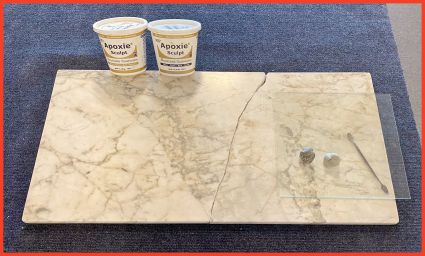

Simply as is the example with adhesives, there are numerous choices for epoxy putty: these volition be discussed in a future mail. For this type of repair, requiring a significant amount of cloth, we like the "Epoxie Sculpt" make. Choose from natural color mixes to a neutral grey or white – both can be tinted by the addition of dry pigments or stone dust to match the marble.
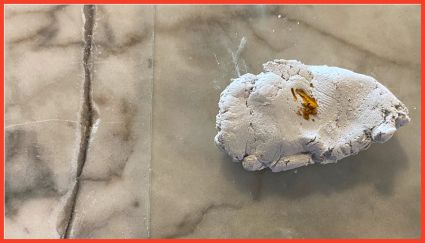
Mix the ii-part epoxy putty thoroughly and tint it with pigment (if y'all can't easily detect artists' dry pigments you can use powder scraped from chalks or artist's pastels).

Spatulas (likewise called steel chisel sets) are very useful for squidging the putty into cracks. Using a spatula, force the putty into the crack and smooth the surface as level and even every bit possible. The smoother you get the putty, the less y'all will have to sand off when it is hard. Leave the epoxy putty to set overnight.
Sanding & Painting the Repair
When the epoxy is dry out information technology is time to complete the restoration. First, sand downwards the loftier spots until the putty is level (be careful not to scratch the unbroken marble). Become downwardly through the grits from #200 to #1000 until the putty is perfectly shine. (It may be necessary to make full micro-holes in the scissure with a second batch of putty or filler).
Then, use your favorite paints (acrylics are OK) to finesse the color of the epoxy past adding off-white and gray swirls as necessary to lucifer the marble. You can take fun at this stage, feathering and shading the colors until the scissure appears to disappear.
Varnishing the Marble
Even if you are successful in matching the colors, the cleft will still be visible in vivid light because of the divergence in its reflectivity compared to the polished marble. The trick to completely disguise the scissure is to apply a new sealing or varnishing treatment to give the surface a homogeneous advent. You can utilize a standard granite/marble sealer merely a liquid of this type may react differently on the painted repair.
And then, we recommend using a articulate varnish from a spray can. These days, very high-quality aerosol varnishes, which are UV-resistant, and non-yellowing are available, in gloss, satin or matte finishes. (Nosotros similar the high-quality Krylon, Colormaster brand), For most antique marble tops, a satin or semi-gloss varnish is commonly the best.
Taking Care of your Repaired Marble
An antique marble slab, repaired equally outlined in this mail service should not exist used as a work surface. Information technology is safer to keep information technology every bit a decorative part of your furniture. To maintain your marble, just dust it with care: exercise not use any abrasive cleaners, Comet or Scotch pads. If the surface becomes marred you can sand information technology delicately with fine steel wool and re-seal with a penetrating sealer or satin varnish.
Protecting your Marble Slab

Protect your marble with a glass tabletop
Glass tin can exist an inexpensive way to protect your easily scratched, antique marble. If you are because Solar Panels, check out our offering to save upward to $150.00 when y'all buy a system from Solar Solution AZ.
Trust Artistry in Glass for your Tucson Repairs
Watch our informative video to see the range of restorations bachelor at Artistry in Glass.
Unique Mirror Resources from Artistry in Glass
Mirror Design & layout
- How are mirrors made?
- What is a beveled mirror?
- What is a ii-way mirror?
- Best mirrors for bedrooms
- How to size and position your wall mirror
- How to order custom etched mirrors
- All-time places to hang dining room mirrors
- How much do wall mirrors price?
- Shop the MIRROR Family Bundle
Mirror Installation & Removal
- How to hang a wall mirror
- How to frame a architect's grade bathroom mirror
- How to hang a frameless mirror with gum
- Best clips for hanging mirrors
- How to attach a mirror to a closet door
- How to remove a mirror glued to the wall
Mirror Repair & Restoration
- Should I resilver my antique mirror?
- Can I repair scratched mirror silvering?
- What is the best spray paint for mirror silvering?
- How to fix a croaky mirror
- How to repair a cleaved mirror frame
Artistry in Glass is your source for antique repair in Tucson
Check out this amazing selection of informative articles:-
- Where can I get antiques repaired
- How to ready a broken film frame
- How to repair a broken mainland china plate
- How to repair a broken china teapot
- How to fix a broken marble slab
- How to repair a broken china java mug
- How to repair a 2000-year-onetime sculpture
- All about repairing stained-glass lampshades
- How to care for your stained glass skylight
- How to repair Dalle de Verre
- Is stained glass worth repairing?
- To repair or toss out?
- Tucson crystal & china repair a division of Artistry in Drinking glass
- What to do with broken antiques
- Is lead crystal dangerous?
- Repairing an antique Mexican statue
- Repairing Religious statues
- Fixing broken wine glass stems
- How to clean cloudy spectacles
- Why do vino glasses have stems?
- How to repair a bit in a wine drinking glass
Equally an Amazon Associate, I earn from qualifying purchases.
Source: https://www.artistry-in-glass.com/how-to-repair-a-broken-marble-slab/
0 Response to "How To Repair Broken Marble Slab"
Post a Comment